
Your WordPress site was functioning perfectly – until a plugin update decided to wreak havoc. Now your site displays a white screen with error messages, or is completely unresponsive. It must feel terrifying to anyone who relies on their website for blogging, business, or content services.
The common causes of these issues include conflicts between two or more plugins, outdated code, or PHP version incompatibilities with other themes or plugins. If left unaddressed, one risks incurring downtime, broken functionalities, or exposing the site to vulnerabilities.
That is the focus of this guide: to assist site owners, developers, and advanced users with overcoming virtually any plugin issue. Whether caused by a faulty update or an underlying bug, you will learn reliable troubleshooting methods to safely restore your website.
For severe cases or when in doubt, reaching out to one of the top WordPress development companies can ensure your site is professionally repaired and optimized.
Common WordPress Plugin Issues & Symptoms
Before diving into fixes, it’s important to recognize the signs of a plugin problem. These symptoms can help you quickly pinpoint whether a plugin is behind your site’s errors or performance issues.
- White Screen of Death (WSOD): A completely blank page caused by a PHP error, often triggered by a faulty or outdated plugin.
- Fatal Errors: Messages like “The plugin could not be loaded” or errors referencing missing functions or files, indicating a critical failure.
- Slow Site Performance: One plugin may be using excessive server resources, leading to long load times or even timeouts.
- 404 Errors or Broken Features: Missing pages, buttons, or tools that used to work—commonly caused by plugin conflicts with themes or other plugins.
- Admin Dashboard Errors: Login loops, blank settings pages, or disappearing menus that disrupt your ability to manage the site.
- Database Corruption: Plugins that improperly modify database tables can break core site functionality and trigger unexpected behavior.
Once you spot these symptoms, you’re in a better position to act. The next steps will help you isolate which plugin is responsible and guide you through resolving it.
Step 1: Identify the Problem Plugin
You can’t fix what you can’t see. If your site is showing errors, crashing, or acting strange, the first step is to figure out which plugin is responsible. Here’s how to diagnose the problem with confidence:
Enable WP_DEBUG in wp-config.php
Go to your site’s root directory using FTP or File Manager in cPanel. Open the wp-config.php file and look for the line that says define(‘WP_DEBUG’, false);. Change it to:
define(‘WP_DEBUG’, true);
define(‘WP_DEBUG_LOG’, true);
define(‘WP_DEBUG_DISPLAY’, false);
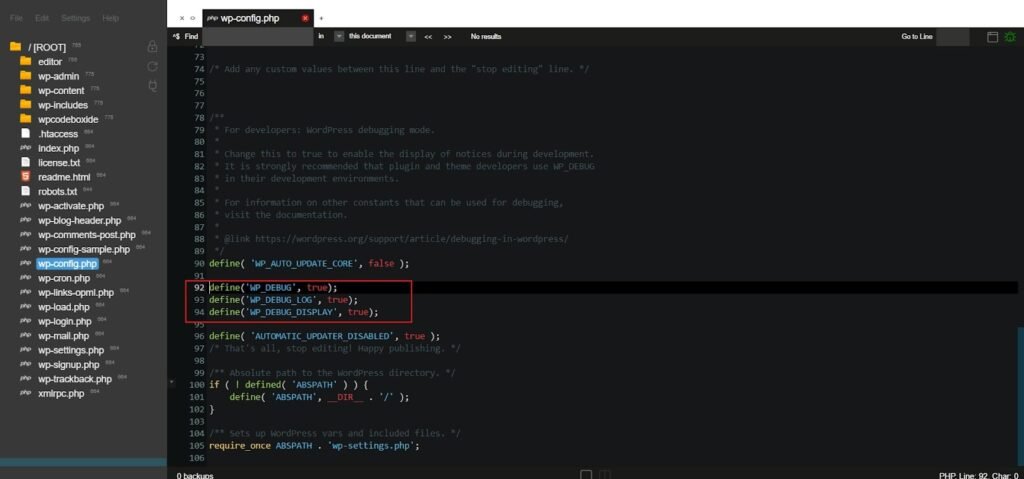
This tells WordPress to log all errors to a debug.log file inside the wp-content folder without showing them on the frontend. Open that file and look for error messages pointing to specific plugins or functions.
Check Server Error Logs
Most hosting providers offer access to error logs via cPanel (under “Errors”, “Metrics”, or “Logs”). You can also check /logs/ folders or ask your host directly. These logs often highlight fatal PHP errors, file paths, and timestamps—giving clues about which plugin failed and why.
Manually Deactivate Plugins via FTP or File Manager
If your admin area is inaccessible, use FTP or the File Manager to go to wp-content/plugins/. Rename plugin folders one by one (e.g., change elementor to elementor-disabled). Refresh your site after each rename. If the site comes back online after disabling one, you’ve likely found the problematic plugin.
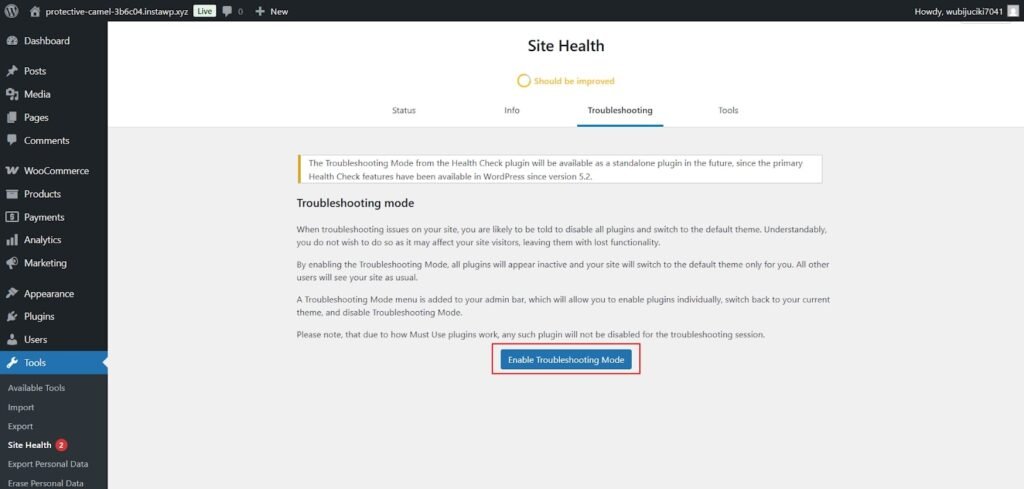
Use the Health Check & Troubleshooting Plugin
If you can still log into the admin dashboard, install the Health Check & Troubleshooting plugin by the WordPress.org team. It adds a “Troubleshooting Mode” that lets only you (as the logged-in admin) disable plugins and themes without affecting what visitors see. This isolated testing environment makes it easy to pinpoint conflicts without downtime.
Review Recent Changes
Think about what changed recently. Did you update a plugin? Install a new one? Sometimes issues begin right after an update. If you’re unsure, check the Plugins page under “Recently Active” or sort by “Last Updated.” Undoing the most recent changes is often the quickest path to resolution.
Once you’ve identified which plugin is causing the issue, you’ll need to choose your next move. Can it be fixed with a setting tweak or update? Is there a conflict that needs reporting to the developer? Or is it safer to replace or remove the plugin entirely? Identifying the problem is half the battle—next, it’s time to take action.
Step 2: Fix Plugin Conflicts
Sometimes, plugins don’t work well together, especially when they serve similar functions or affect the same parts of your website. Conflicts can lead to broken features, strange layouts, or even complete admin lockout. Understanding how to pinpoint and resolve these clashes can help you get your site back to normal without losing important functionality.
1. Test with a Default Theme
Themes can sometimes be the real culprit. To eliminate that variable, switch to a clean, default theme like Twenty Twenty-Four via Appearance > Themes in your dashboard or from the database if you’re locked out.
- If the issue disappears, your theme and a plugin are conflicting.
- If it remains, you can safely rule out the theme.
2. Adjust Plugin Load Order
The order in which WordPress loads plugins can affect how they behave.
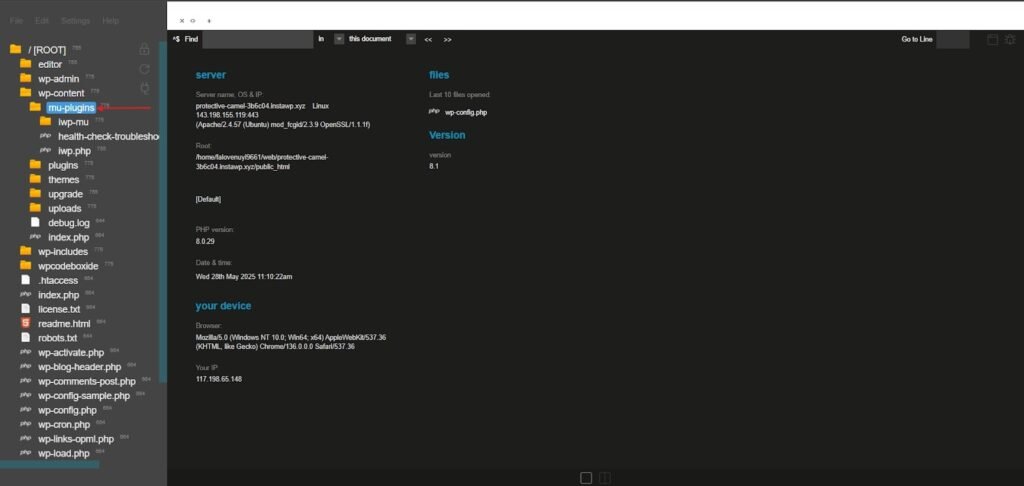
- Create a folder inside wp-content called mu-plugins (if it doesn’t exist).
- Move or replicate the most important plugin files into this folder.
- These “Must-Use” plugins are loaded earlier than others, which can resolve priority issues (especially for SEO or security plugins).
3. Patch JavaScript or CSS Conflicts
When two plugins load similar JavaScript libraries or styles, you may experience:
- Layouts breaking
- Buttons not working
- Console errors in your browser
To troubleshoot:
- Open Chrome DevTools (Right-click → Inspect → Console).
- Look for JavaScript errors or multiple inclusions of libraries like jQuery.
- Use WordPress functions like wp_dequeue_script() or wp_dequeue_style() inside your theme’s functions.php file to disable conflicting files.
Example:
function fix_conflicting_scripts() {
wp_dequeue_script(‘conflicting-plugin-script’);
}
add_action(‘wp_enqueue_scripts’, ‘fix_conflicting_scripts’, 100);
4. Increase WordPress Memory Limit
Sometimes, conflicts aren’t from code but from resource limitations. Plugins that are heavy on server-side operations may clash simply because the server runs out of memory.
- Edit wp-config.php and add:
define(‘WP_MEMORY_LIMIT’, ‘256M’);
- Also check your PHP settings in cPanel and increase the memory limit there too if needed.
This fix is especially useful if your site is hosted on shared servers with limited resources.
5. Manual Conflict Testing (The Process of Elimination)
This is your most reliable method to uncover which plugin is responsible.
- Deactivate all plugins from the dashboard or by renaming the /wp-content/plugins/ folder via FTP or File Manager.
- Reactivate each plugin one by one, refreshing your site each time.
- As soon as the error returns, you’ve found the problematic plugin.
It would help if you kept a record of which plugins are active to not lose track. Although time-consuming, this step is the most informative.
Never hesitate to seek other suitable options if a plugin persists with issues and no updates are offered. Your website’s stability highly outweighs the need to continue using a broken plugin. Consider hiring a developer to build a tailored solution.
Step 3: Repair Corrupted Databases
Sometimes, uninstalling a plugin isn’t enough. It may leave behind orphaned tables, broken relationships, or unnecessary entries that clutter and damage your WordPress database. This can lead to slower site performance, incomplete features, or unexpected errors. Cleaning up these database issues is crucial for restoring your site’s stability and efficiency.
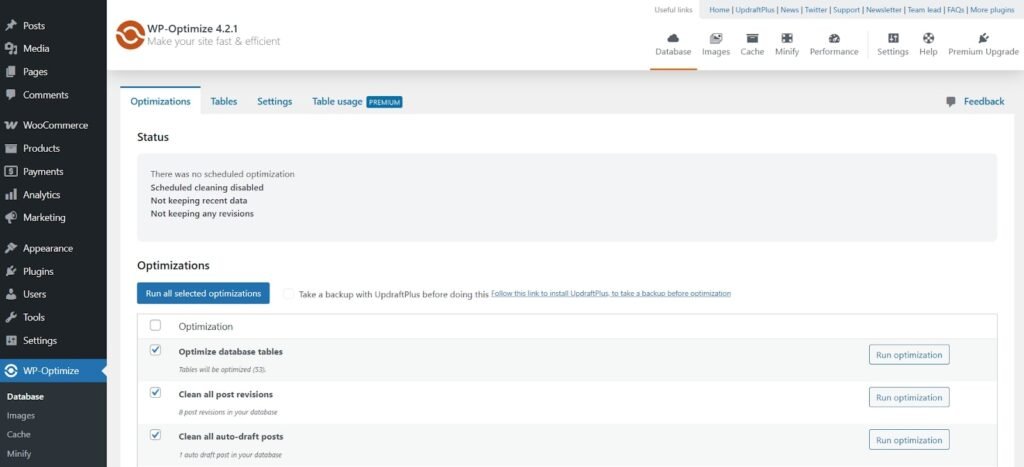
1. Use WP-Optimize Plugin
WP-Optimize is a user-friendly plugin that helps clean your database with just a few clicks.
- Install and activate WP-Optimize from your dashboard.
- Go to WP-Optimize > Database and review the available optimizations.
- Select options like “Remove orphaned tables,” “Clean post revisions,” and “Optimize database tables.” This is a safe first step that doesn’t require coding.
2. Manual SQL Fixes via phpMyAdmin
For deeper issues, log into your hosting control panel and access phpMyAdmin.
- Review the database and look for tables with unusual prefixes or ones clearly left by a removed plugin.
- Delete those tables only if you’re confident they aren’t used by active plugins.
- Be cautious: deleting the wrong table can break your site.
Example query to drop a table:
DROP TABLE wp_oldplugin_data;
3. Roll Back to a Clean Database Backup
If your issues started after a recent plugin change, the safest option may be restoring from a backup.
- Use your hosting provider’s backup tool or a plugin like UpdraftPlus or BlogVault.
- Restore the most recent backup from before the problem occurred.
This ensures you revert to a stable state and avoid manually cleaning up corrupted data.

4. Reset Plugin Settings via wp_options
Sometimes, a plugin stores persistent settings that stay even after deletion.
- In phpMyAdmin, go to your site’s database and open the wp_options table.
- Search for rows where the option_name contains the plugin name.
- Delete these rows to fully reset plugin settings.
Example SQL:
DELETE FROM wp_options WHERE option_name LIKE ‘%pluginname%’;
Repairing database issues can be technical, but it’s a necessary step when dealing with lingering plugin problems. Always backup your database before making any changes, whether using plugins or manual methods. Cleaning up old plugin data keeps your site lean, fast, and far less prone to crashes.
Step 4: Handle Plugin Update Failures
Plugin updates are supposed to bring improvements, but sometimes they do more harm than good. A faulty update can crash your site, cause layout issues, or even expose security flaws. If your site breaks right after a plugin update, don’t panic—there are ways to safely roll back and recover functionality.
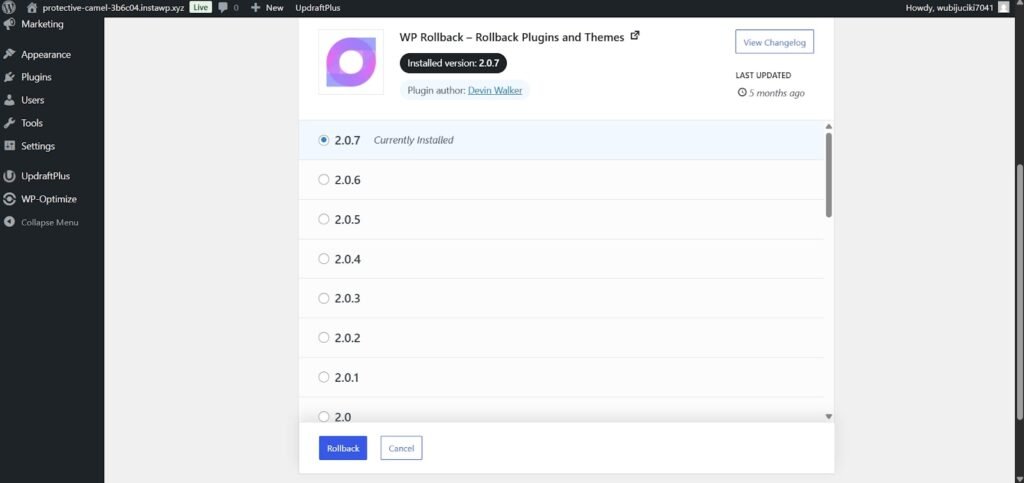
Roll Back the Plugin
If an update caused the issue, revert to a previous stable version.
- Use the WP Rollback plugin to easily downgrade to an earlier version from the plugins page.
- Alternatively, manually download the previous version from the WordPress Plugin Repository and upload it via FTP.
This gets your site back to a working state while you investigate further.
Reinstall Cleanly
Sometimes an update doesn’t install properly or leaves behind corrupted files.
- Delete the plugin completely (make sure to back up settings if necessary).
- Reinstall the latest version from the official WordPress repository or the plugin’s official site.
A fresh install often fixes issues that updates trigger.
Patch Known Vulnerabilities
If the update was released to fix a security hole, check if it’s a known issue.
- Visit public databases like CVE Details or the plugin’s changelog.
- If a vulnerability is known, look for an official patch or mitigation from the developer.
This step is especially important for security-critical plugins like firewalls or form handlers.
Verify Compatibility
Always test updates on a staging site before applying them to your live site.
- This lets you see if the update causes theme or plugin conflicts.
- Many managed hosts offer one-click staging environments for this purpose.
Avoid auto-updating mission-critical plugins, especially on high-traffic sites. Test updates in a safe environment and keep backups ready. A few minutes of testing can save hours of downtime.
Step 5: Advanced Debugging
When basic troubleshooting doesn’t cut it, it’s time to dig deeper. For developers or anyone comfortable with code, advanced debugging tools can uncover hidden issues that aren’t obvious through normal checks. These methods help you understand exactly what’s going wrong inside your plugins and how to fix it.
Xdebug + IDE Setup
Xdebug is a powerful PHP debugger that works with many popular IDEs like PhpStorm or VS Code.
- Set up Xdebug on your local or staging environment.
- Use breakpoints to pause execution and inspect variables, function calls, and plugin behavior step-by-step.
This hands-on approach lets you pinpoint errors or conflicts within plugin code directly.
Query Monitor Plugin
This plugin is a developer’s best friend for spotting slow database queries, excessive hooks, or PHP errors.
- Install Query Monitor and open its panel in your admin toolbar.
- Review slow or failed queries, HTTP API calls, and hooks fired by plugins.
- Identify which plugin actions cause performance issues or errors without digging through logs.
Server-Level Checks
Sometimes plugin issues aren’t caused by WordPress alone. Server configurations like PHP-FPM, OPcache, or cron jobs can impact plugin behavior.
- Check your server error logs for PHP crashes or warnings.
- Review OPcache settings—incorrect caching can serve outdated plugin code.
- Verify scheduled tasks (cron) are running, especially if plugins rely on them for updates or data processing.
Custom Error Handlers
Add custom error logging within plugin code to capture specific failures.
- Modify your plugin to write detailed error messages to a log file instead of just displaying generic errors.
- This helps track down intermittent bugs or conflicts that don’t trigger standard WordPress logs.
Advanced debugging tools and techniques give you a clear view into what’s happening behind the scenes. These approaches uncover issues that most users never detect, allowing for precise fixes and improved site stability.
Conclusion
While dealing with a WordPress site, problems with plugins can occur from time to time. These problems, however, should not be crippling. If you follow a concrete plan—debug every problem that arises, isolate the culprit plugin, apply the necessary fix, and take preventive measures to mitigate future complications—then you can resolve most of the issues with minimal impact and efficiently deal with a majority of plugins problems.
Any form of updates or new plugins must always be tested in a staging environment before applying them to the live site to avoid harsh undesired outcomes. With consistent backups as well as active monitoring, keeping an eye on plugins, and performing audits, your website will stay safe and in good condition. Have you ever faced an uncontrolled plugin failure? Let’s hear your comments regarding this scenario and help others draw valuable insight from your experience.